Vue 專案內使用共同 SASS 資源
Vue 專案目錄結構
manifest.json
firebase-messaging-sw.js
src/main.js
Get Push Token
Get Push Notification
發送推播
這幾個月來一直懶得更新文章,其實一直想找時間把最近工作的一些事項做些紀錄,結果都一直在看新入坑女團(GFriend)的影片,由於昨天一整天一直在鬼打牆,早上打破一片牆,下午又再遇到一片牆,好在下班前有所突破,趁著記憶猶新的時候,趕緊紀錄一下。
其實到目前為止,本身對於 PWA (Progressive Web Apps) 沒啥研究,所以對 Service Worker 也不太了解,在這種情況下就去串接 Firebase Cloud Messaging,真的有點越級挑戰了,所以一直碰到問題也很正常,甚至一度不曉得該先解決什麼問題,雖然下班前有完成一個簡單的 Web Push Notification,但還是覺得有些運氣成份在。
前情提要一下,目前的前端專案是使用 vue-cli 3.0 版搭配 webpack 樣板建置的,其實對於 webpack 的一堆設定也都還沒完全了解,所以三不五時會遇到一些問題,加上 vue-cli 版本比較新,有時上網找答案常常會找到 2.x 版的一些例子,只能先了解後會意,然後再 try & error 的解決。
有個自己每次重開機就會遇到的問題:
node 版本需要 8.x 以上才能執行,所以透過 nvm 來裝不同版本切換
Vue 專案內使用共同 SASS 資源 另外為了全域共同 sass 檔案來做一些定義,如:變數, Mixins, class 等,也是花了一番功夫
由於不是本篇重點,所以只記錄重點
npm install --save-dev sass-resources-loader修改 /build/utils.js 檔案內的 exports.cssLoaders function
大致修改如下:把原本 sass loader 的 function 替換成新加入的 function
exports.cssLoaders = function (options) {
  options = options || {}
  const cssLoader = {...}
  const postcssLoader = {...}
  function generateLoaders (loader, loaderOptions) {...}

  // =========
  // SASS 配置
  // =========
  function resolveResouce(name) {
    return path.resolve(__dirname, '../src/assets/sass/' + name);
  }

  function generateSassResourceLoader() {
    let loaders = [
      cssLoader,
      // 'postcss-loader',
      {
        loader: 'sass-loader',
        options: {
          indentedSyntax: true
        }
      },
      {
        loader: 'sass-resources-loader',
        options: {
          // it need a absolute path
          // global usage sass file
          resources: resolveResouce('resources.sass')
        }
      }
    ];
    if (options.extract) {
      return ExtractTextPlugin.extract({
        use: loaders,
        fallback: 'vue-style-loader'
      })
    } else {
      return ['vue-style-loader'].concat(loaders)
    }
  }

  return {
    css: generateLoaders(),
    postcss: generateLoaders(),
    less: generateLoaders('less'),
    // sass: generateLoaders('sass', { indentedSyntax: true }),
    // scss: generateLoaders('sass'),
    sass: generateSassResourceLoader(),
    scss: generateSassResourceLoader(),
    stylus: generateLoaders('stylus'),
    styl: generateLoaders('stylus')
  }
}
接下來進入正題,其實 vue + firebase cloud messaging 網路上找也有一些相關文章或範例 ,而且 firebase 本身也有介紹如何在 client 的 Javascript 設置 FCM ( Set Up a JavaScript Firebase Cloud Messaging Client App ),而我一開始也是按照 firebase 上的文章做,但沒多久就碰到問題,無法取得 token….XD
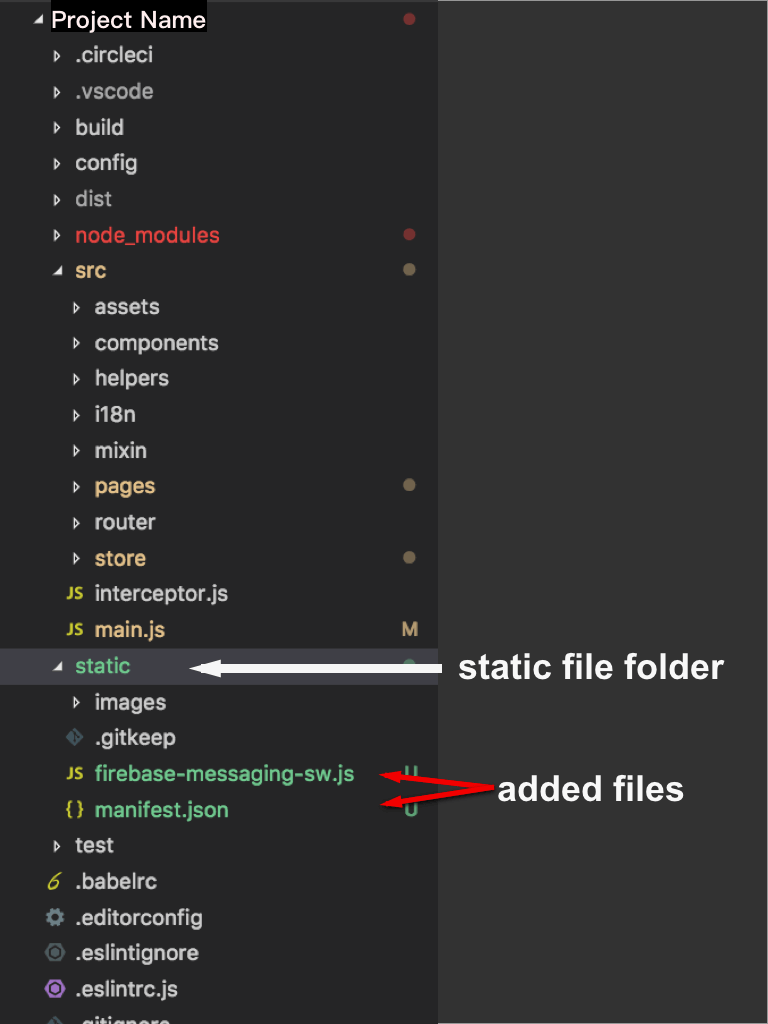
Vue 專案目錄結構 一開始以為是透過 vue-cli 在 local 開發,所產生的網址是沒有 https 的 http://localhost:8081 (因為 8080 port 用來啟動後端 API server),所以一度去找了 ngrok 這軟體來用,不過還是一直有問題,後來發現似乎是要跟 FCM 取得 token 時,需要一支 service worker 的 js 檔,而預設會使用位置是 SERVER_ROOT/firbase-messaging-sw.js,然後就去找了些文章看,似乎我還少了這麼一隻 service worker 註冊的檔案,所以除了要加上這隻檔案,又遇到如何讓 vue-cli build 出來的目錄也能有這個檔案以及讀取路徑的問題….唉~
最終還是逃不過要像 PWA 一樣有個 manifest.json 描述檔,以及一個 service-worker.js 檔,所以這檔案都放到到 static 目錄下,讓專案編譯後能夠在複製一份到 dist 目錄內,目前專案目錄的架構大致如下:
manifest.json 裡面最重要的一行,就是記得加上 gcm_sender_id,這在 firebase 教學文件裡的步驟有提到
{
  "short_name": "YOUR_PROJECT_SHORT_NAME",
  "name": "YOUR_PROJECT_NAME",
  "icons": [
    {
      "src": "/static/images/logo.png",
      "type": "image/png",
      "sizes": "192x192"
    }
  ],
  "start_url": "/",
  "background_color": "#ecf0f2",
  "display": "fullscreen",
  "theme_color": "#34aeab",
  "gcm_sender_id": "YOUR_SENDER_ID"
}
而主要頁面 index.html 需要能夠讀取到 manifiest.json 檔案,所以 index.html 內的 <head> 需要加入底下這行
<link rel="manifest" href="<%= htmlWebpackPlugin.files.publicPath %>static/manifest.json">
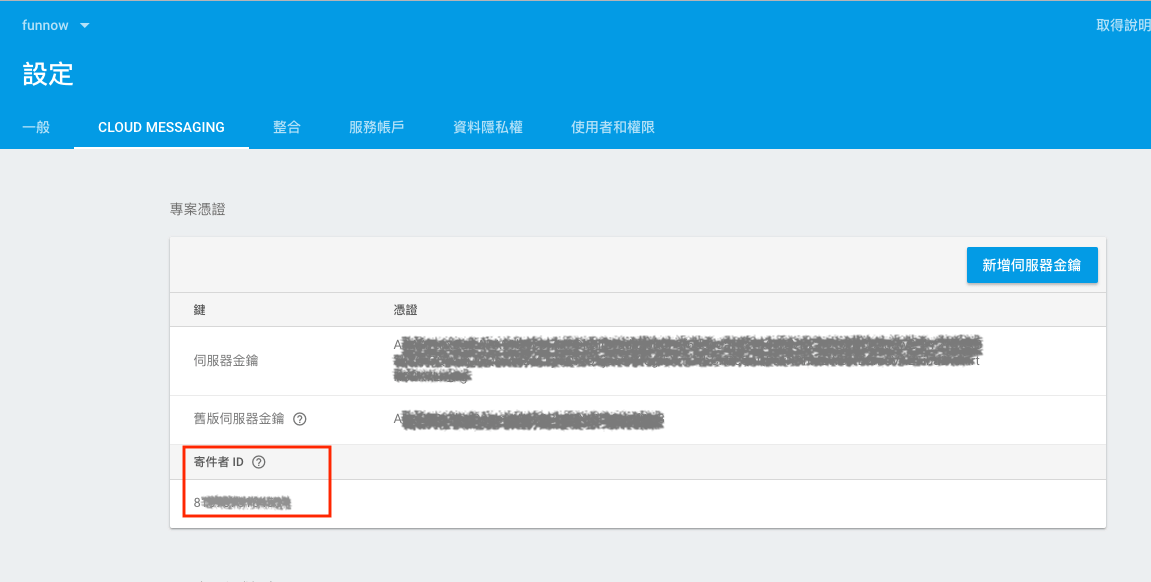
firebase-messaging-sw.js 這是給 service worker register 用的檔案,內容分兩部分,先介紹第一部分,重點是 firebase 專案內的 sender_id 要記得加進去
// [START initialize_firebase_in_sw]
// Import and configure the Firebase SDK
// These scripts are made available when the app is served or
// deployed on Firebase Hosting
// If you do not serve/host your project using Firebase Hosting
// see https://firebase.google.com/docs/web/setup

importScripts('https://www.gstatic.com/firebasejs/5.0.0/firebase-app.js');
importScripts('https://www.gstatic.com/firebasejs/5.0.0/firebase-messaging.js');

firebase.initializeApp({
  messagingSenderId: 'YOUR_SENDER_ID'
});

const messaging = firebase.messaging();
// [END initialize_firebase_in_sw]
src/main.js 另外要讓 service worker 可以正確使用這檔案,需要透過 navigator.serviceWorker.register 這來指定路徑
底下是目前使用的方式,在 /src/main.js 裡面將 FCM 設定好,這裡需要先取的 web push 所需要的 public VAPID key,可以參考這裡
const FCMconfig = {
  apiKey: 'YOUR_API_KEY',
  authDomain: 'YOUR_DOMAIN',
  databaseURL: 'https://<YOUR_PROJECT_ID>.firebaseio.com',
  projectId: 'YOUR_PROJECT_ID',
  storageBucket: '<YOUR_PROJECT_ID>.appspot.com',
  messagingSenderId: 'YOUR_SENDER_ID'
}

firebase.initializeApp(FCMconfig)

Vue.prototype.$messaging = null
if (firebase.messaging.isSupported()) {
  firebase.initializeApp(FCMconfig)
  // Retrieve Firebase Messaging object, assign to Vue Object
  Vue.prototype.$messaging = firebase.messaging()
  // Add the public key generated from the Firebase console
  Vue.prototype.$messaging.usePublicVapidKey(process.env.VAPID_KEY)
}

// Change server-worker.js register path
navigator.serviceWorker.register('/static/firebase-messaging-sw.js')
  .then((registration) => {
    Vue.prototype.$swRegistration = registration
    Vue.prototype.$messaging.useServiceWorker(registration)
  }).catch(err => {
    console.log(err)
  })
上述使用 Vue.prototype.$messaging 來引入全域變數 $messaging 方便後面在不同 .vue 檔內都可以使用,所以接下來就可以真的來取得 push token 了
Get Push Token 接著就可以在 vue 內,可以參考下面範例
<template> <div > ... <button @click ="registeFCM" > Register</button > ... </div > </template> <script > import 'firebase/messaging' export default { data () { return { } }, mounted () { this .initFCM() }, methods : { initFCM () { this .$messaging.onTokenRefresh(() => { this .$messaging.getToken().then((refreshedToken ) => { console .log('Token refreshed.' ) this .setTokenSentToServer(false ) this .sendTokenToServer(refreshedToken) }) }) }, registeFCM () { this .$messaging.requestPermission().then(() => { console .log('Notification permission granted.' ) this .getToken() }).catch((err ) => { console .log('Unable to get permission to notify.' , err) }) }, getToken () { this .$messaging.getToken().then((currentToken ) => { if (currentToken) { this .sendTokenToServer(currentToken) } else { console .log('No Instance ID token available. Request permission to generate one.' ) this .setTokenSentToServer(false ) } }).catch((err ) => { console .log('An error occurred while retrieving token. ' , err) this .setTokenSentToServer(false ) }) }, sendTokenToServer (token) { }, setTokenSentToServer (type) { if (type) return } } } </script > <style lang ="sass" scoped > // ... </style >
Get Push Notification 當推播發送成功後,接收 push notification 有兩種情況,網站開啟時,與網頁關閉時,底下再針對兩種情況繼續說明
網站開啟時,收到推播 透過 firebase messaging 的 onMessage 來接收通知
this .$messaging.onMessage(payload => console .log('Message receiver ' , payload); let notification = payload.notification; console .log('Notification: ' , notification); });
網頁關閉下,收到推播 透過在 service worker 內寫的背景接收通知的處理,所以原本的 sw.js 又要繼續第二部分的 code
messaging.setBackgroundMessageHandler(function (payload ) console .log( '[firebase-messaging-sw.js] Received background message ' , payload ); var notification = payload.notification; var notificationTitle = notification.title; var notificationOptions = { body : notification.body, icon : '/static/images/logo.png' }; return self.registration.showNotification( notificationTitle, notificationOptions ); });
所以完整的 firebase-messaging-sw.js 檔案如下:
importScripts('https://www.gstatic.com/firebasejs/5.0.0/firebase-app.js' ); importScripts('https://www.gstatic.com/firebasejs/5.0.0/firebase-messaging.js' ); firebase.initializeApp({ messagingSenderId : 'YOUR_SENDER_ID' }); const messaging = firebase.messaging();messaging.setBackgroundMessageHandler(function (payload ) console .log( '[firebase-messaging-sw.js] Received background message ' , payload ); var notification = payload.notification; var notificationTitle = notification.title; var notificationOptions = { body : notification.body, icon : '/static/images/logo.png' }; const promiseChain = clients .matchAll({ type : 'window' , includeUncontrolled : true }) .then(windowClients => for (let i = 0 ; i < windowClients.length; i++) { const windowClient = windowClients[i]; windowClient.postMessage(notify); } }) .then(() => { return self.registration.showNotification( notificationTitle, notificationOptions ); }); return promiseChain; });
發送推播 為了發送推播也是莫名其妙地遇到問題,鬼打牆了好一陣子才解決,照著 firebase 說明 做,遇到了些問題
POST 的網址,project id 帶進去似乎還是錯誤…why?
Authorization 的值到底從何而來,找了很久一直找不到 firebase 專案設定內有類似的值
所以一直無法順利測試,後來又翻到了另一篇文章 ,首先這個發送的網址固定,看起來沒問題,而 Authorization 就是 Firebase 專案設定裡面的 Server Key,就用這個試試看吧!
https://fcm.googleapis.com/fcm/send
Content-Type: application/json
Authorization: key=AIzaSyC...akjgSX0e4


{ "notification": {
    "title": "Background Message Title",
    "body": "Background message body",
    "click_action" : "https://dummypage.com"
  },

  "to" : "eEz-Q2sG8nQ:APA91bHJQRT0JJ..."

}
一開始測試時,一直遇到 UnAuthorization 的錯誤,找了解決辦法還是沒找到可用的,就想說把 Server Key 從舊版的換成新版的(加密後資料長度長很多),結果就發送成功了…其實我真的不懂為什麼,今天再換回舊版 server key 還是可以發送,那昨天下午到底是什麼詭異狀況?
總之最後是成功做完一個基本 web push notification 的流程了,真是可喜可賀!打完收工!

